Let’s install some stuff.
$ pip install opencv-python numpy PyQt5
Let’s import some stuff.
import sys
from os import path

import cv2
import numpy as np

from PyQt5 import QtCore
from PyQt5 import QtWidgets
from PyQt5 import QtGui
Now we’ll build this backwards, starting with the smallest pieces and working bigger. Let’s start working on creating the video recording and getting the face coordinates out.
class RecordVideo:
        def __init__(self, camera_port=0):
                self.camera = cv2.VideoCapture(camera_port)
                self.running = False

        def run(self):
                self.running = True
                while self.running:
                        read, image = self.camera.read()
                        # TODO: detect faces now
Awesome, now let’s work on the facial detection.
class FaceDetection:
        def __init__(self, haar_cascade_filepath):
                self.classifier = cv2.CascadeClassifier(haar_cascade_filepath)
                self._min_size = (30, 30)

        def detect_faces(self, image):
                # haarclassifiers work better in black and white
                gray_image = cv2.cvtColor(image, cv2.COLOR_BGR2GRAY)
                gray_image = cv2.equalizeHist(grey_image)

                faces = self.classifier.detectMultiScale(grey_image, scaleFactor=1.3, minNeighbors=4, flags=cv2.CASCADE_SCALE_IMAGE, min_size=self._min_size)

                # TODO: Paint on a surface and add the faces.
Ok so we need something to paint on. This is where we need to switch gears a little bit. We’re going to use Qt to paint on. So we’ll need to rework some of classes to play nicely with Qt.
We’ll start by making our RecordVideo a subclass of QObject. We’ll also create a signal called image_data and have it emit a np.ndarray in the timerEvent. We’ll use it in the timerEvent so that we can keep it single threaded.
If that sounds confusing, don’t worry. The code isn’t that long.
class RecordVideo(QtCore.QObject):
        image_data = QtCore.pyqtSignal(np.ndarray)

        def __init__(self, camera_port=0, parent=None):
                super().__init__(parent)
                self.camera = cv2.VideoCapture(camera_port)
                self.timer = QtCore.QBasicTimer()

        def start_recording(self):
                self.timer.start(0, self)

        def timerEvent(self, event):
                if (event.timerId() != self.timer.timerId()):
                        return

                read, image = self.camera.read()
                if read:
                        self.image_ready.emit(image)
We need to extend our Face Detection as well. We’ll make it a QWidget, because we want to paint on it. We’ll add a new method that converts our ndarray into a QImage. The painting loop occasionally might be too slow, so we’ll save the image to the class and call the update method at the end of the slot. We’ll draw the rectangle on into the data using the cv2.rectangle method call.
class FaceDetectionWidget(QtWidgets.QWidget):
        def __init__(self, haar_cascade_filepath, parent=None):
                super().__init__(parent)
                self.classifier = cv2.CascadeClassifier(haar_cascade_filepath)
                self.image = QtGui.QImage()
                self._red = (0, 0, 255)
                self._width = 2
                self._min_size = (30, 30)

        def detect_faces(self, image: np.ndarray):
                # haarclassifiers work better in black and white
                gray_image = cv2.cvtColor(image, cv2.COLOR_BGR2GRAY)
                gray_image = cv2.equalizeHist(gray_image)

                faces = self.classifier.detectMultiScale(gray_image, scaleFactor=1.3, minNeighbors=4, flags=cv2.CASCADE_SCALE_IMAGE, minSize=self._min_size)

                return faces

        def image_data_slot(self, image_data):
                faces = self.detect_faces(image_data)
                for (x, y, w, h) in faces:
                        cv2.rectangle(image_data, (x, y), (x+w, y+h), self._red, self._width)

                self.image = self.get_qimage(image_data)
                if self.image.size() != self.size():
                        self.setFixedSize(self.image.size())

                self.update()

        def get_qimage(self, image: np.ndarray):
                height, width, colors = image.shape
                bytesPerLine = 3 * width
                QImage = QtGui.QImage

                image = QImage(image.data, width, height, bytesPerLine, QImage.Format_RGB888)

                image = image.rgbSwapped()
                return image

        def paintEvent(self, event):
                painter = QtGui.QPainter(self)
                painter.drawImage(0, 0, self.image)
                self.image = QtGui.QImage()
Now let’s tie these two together. We’ll create a MainWidget class that instantiates both of our two custom classes, puts our widget in a Layout along with a start button. We also need to tie together both the image signal/slot and the click’d and start recording method.
class MainWidget(QtWidgets.QWidget):
        def __init__(self, haarcascade_filepath, parent=None):
                super().__init__(parent)
                fp = haarcascade_filepath
                self.face_detection_widget = FaceDetectionWidget(fp)

                # TODO: set video port
                self.record_video = RecordVideo()
                self.run_button = QtWidgets.QPushButton('Start')

                # Connect the image data signal and slot together
                image_data_slot = self.face_detection_widget.image_data_slot
                self.record_video.image_data.connect(image_data_slot)
                # connect the run button to the start recording slot
                self.run_button.clicked.connect(self.record_video.start_recording)

                # Create and set the layout
                layout = QtWidgets.QVBoxLayout()
                layout.addWidget(self.face_detection_widget)
                layout.addWidget(self.run_button)

                self.setLayout(layout)
Now we just need to create our QApplication, QMainWindow, and our custom MainWidget.
def main(haar_cascade_filepath):
        app = QtWidgets.QApplication(sys.argv)

        main_window = QtWidgets.QMainWindow()
        main_widget = MainWidget(haar_cascade_filepath)
        main_window.setCentralWidget(main_widget)
        main_window.show()
        sys.exit(app.exec_())
Now we need to pass in the haarcascade file. I saved it using this shell script.
$ curl https://raw.githubusercontent.com/opencv/opencv/master/data/haarcascades/haarcascade_frontalface_default.xml > haarcascade_frontalface_default.xml
You’ll have to change the code to match your local setup.
I’ll distribute this out on pypi so you can install it eventually.
if __name__ == '__main__':
        script_dir = path.dirname(path.realpath(__file__))
        cascade_filepath = path.join(script_dir, '..', 'data', 'haarcascade_frontalface_default.xml')

        cascade_filepath = path.abspath(cascade_filepath)
        main(cascade_filepath)
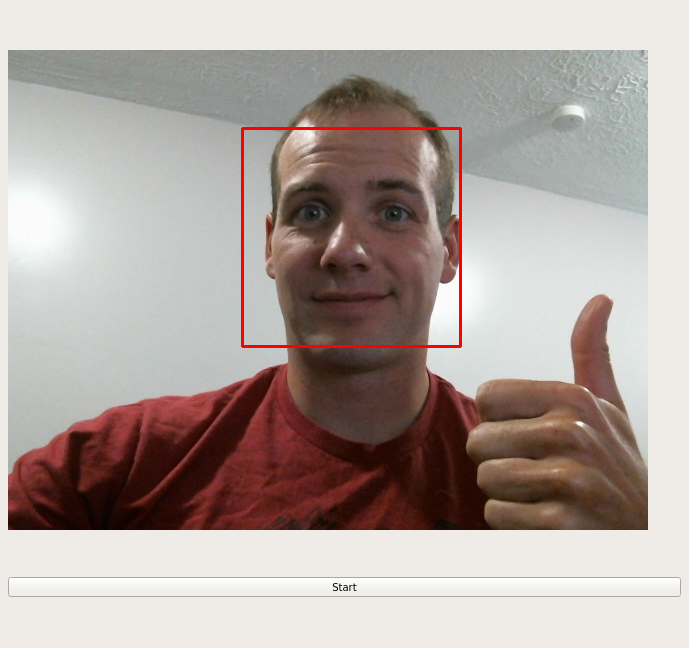
Success!
You can see all the source code here.
Comments !