Getting Started
This is the first step in the PyQt Tutorial series! Welcome!
We’re going to start with a hello world application, as sometimes getting everything installed and working correctly can be an emotionally terrifying experience. Just ask me. I’ve done software before.
So starting from nothing.
Install Python
Follow these installation instructions, based on your OS.
If you’re running a linux distribution, you can likely use your native package manager.
Make sure if you’re running Windows that you add Python to your path library. It should be a pop-up option during the install. If you mess up, turn to Google.
Make sure you install Python 3. This tutorial will not be for Python 2 as Python 2 is reaching it’s end of life for official support.
Create A Working Directory
Create a directory you want to work out of.
$ mkdir pyqt
$ cd pyqt
Create Virtual Environment
We’re going to create and activate a virtual environment, so that your global site-packages stay clean. Hard to keep track of which project, installed which dependencies, otherwise.
$ python -m venv <DIR>
$ source <DIR>/bin/activate
Install PyQt5
Right, now that our virtual environment is activated, let’s install PyQt.
$ pip install PyQt5
Build the Framework
Now, fire up your favorite text editor, it’s time to start programming. Create a file named __main__.py and add the following to it.
# file name: __main__.py

def main():
    pass

if __name__ == "__main__":
    main()
Write PyQt Specific Code
Now, in our main function, we’re going to create an instances of QApplication and QMainWindow. I’d recommend reading the documentation on QApplication, especially the section with the main areas of responsibility.
If you don’t get there, the TLDR on QApplication responsibilities:
- event handling
- main settings
QMainWindow is a magical class. It gives a lot of normal desktop interface aspects that you’ve come to expect, such as a menu bar, tool bars, and status bars… for free. Again, the documentation is awesome, but check out the below figure to get a hint for the types of functionality that are integrated into the QMainWindow class.
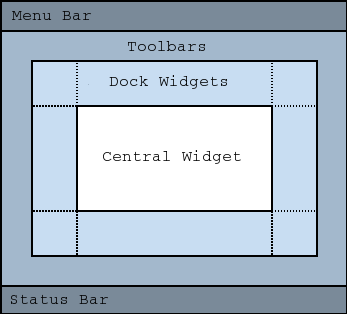
Notice that the Menu Bar and Status Bar are tied to QMainWindow. We’ll come back to that.
So now that we now a little bit about what we’re doing, let’s write the rest of the code. The entire source script is available at this link as well.
# file name: __main__.py

import sys
from PyQt5 import QtCore, QtWidgets

def main():
    # We need to make the QApplication before our QMainWindow
    # We also need to pass in our system argument values (sys.argv)
    app = QtWidgets.QApplication(sys.argv)
    main_window = QtWidgets.QMainWindow()
    # QMainWindow requires a central widget, so we'll just pass in a
    # blank widget for now
    blank_widget = QtWidgets.QWidget()
    main_window.setCentralWidget(blank_widget)
    # Show our main window
    main_window.show()
    # Start the event loop processing
    app.exec()
That’s it! You should see a small window open up. We’ve got the “Hello World” version for GUI programming.
The next step is to talk about choices for our central widget design, but if you’re an advanced PyQt programmer already, you can checkout this high level overview of the tutorial series to jump around to the topic you need.
Comments !